
Lead flashing · 9 min read
Lead flashing: where it goes, how it fails and how it is renewed
What lead flashing does at a chimney, wall, dormer or valley, why it is the part of a roof most likely to let water in, and how a worn flashing is repaired or renewed.
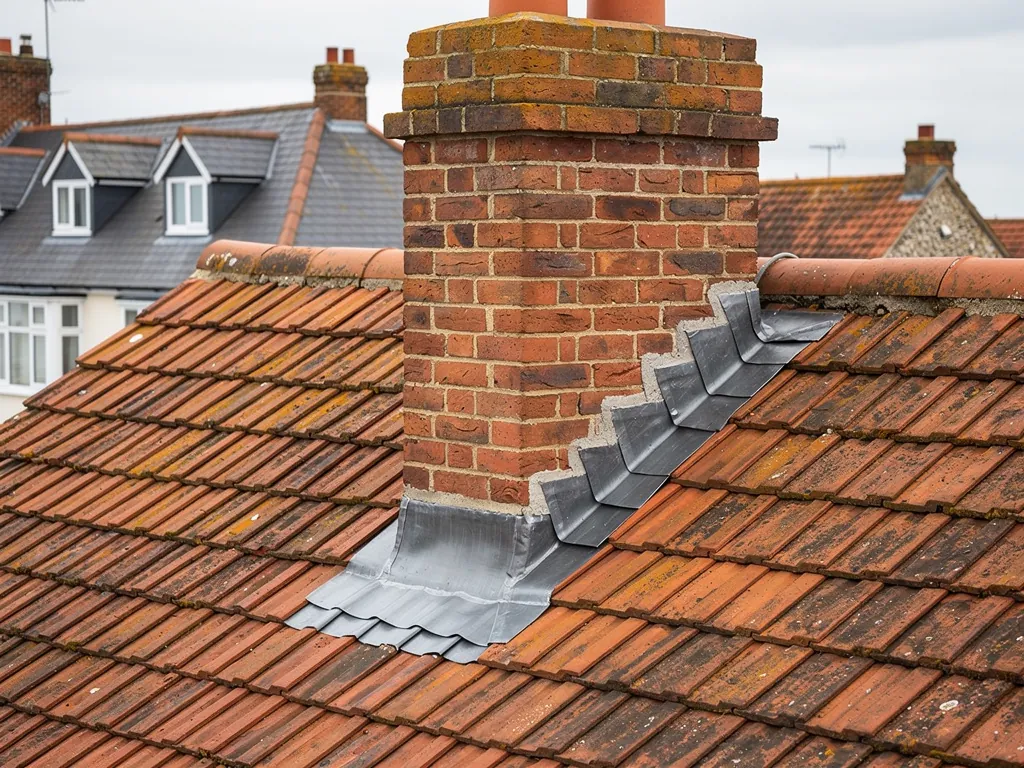
A roof covering sheds water well across a flat expanse of tiles or slates. The trouble starts where the covering stops: against a chimney, up to a house wall, round a dormer window or down into a valley. Each of those junctions is a gap that rain can find, and lead flashing is the metal strip made to close it.
Lead suits the job because it is soft enough to be dressed by hand into the shape of the brickwork and the profile of the tiles, and it keeps its shape afterwards. It is also why leaks so often trace back to flashing rather than to the covering itself. Lead moves with the weather, the surrounding masonry shifts and ages, and a flashing that was perfect when it went on can lift, split or lose its pointing years later.
This guide covers where lead flashing is used, the names of its parts, how it is held in place and how it fails. It finishes with how a worn flashing is stripped and replaced, so that when someone tells you the lead needs doing, you know what that means.
Where lead flashing goes on a house
Walk round a house and you can find lead at most of the places where two surfaces meet. The commonest is the chimney, which usually carries lead on all four sides. Next comes the abutment, where a pitched roof runs up to a taller wall, such as the party wall between semis or the wall of a two-storey section beside a lower extension. Lead also lines the valleys where two slopes meet, trims the cheeks and tops of dormer windows, and seals the junction between a bay window roof and the wall above it.
Flat roofs have their own lead details. Where a flat roof meets a house wall, a band of lead is set into a mortar joint and turned down across the edge of the membrane. Parapet walls and the gutters behind them are often lined with lead. A conservatory is another case: its roof meets the house at a line that needs a flashing along its whole length.
Why the junctions fail first
A tile or slate sheds water by overlapping the one below. A junction has no such overlap to rely on, so it depends on a separate piece of metal doing the work. That piece has to cope with wind lifting its edge, with rain running down the wall behind it, and with the movement between a heated house and a cold roof. A junction is also the place where two different materials, brick and tile, expand and shrink at different rates.
This is why a roofer looking for a leak starts with the lead. A stain that shows on a bedroom ceiling beside a chimney breast is more often a flashing problem than a hole in the tiles. Our answer on why lead flashing leaks follows that trail in more detail.
The names of the parts: apron, step, cover and soaker
Roofers use a small vocabulary for flashing, and knowing it makes a quote easier to read. The trade names describe the position and the way the piece is shaped.
- Apron flashing: a single piece along the lower face of a chimney or the foot of a wall, lying over the tiles below and turned up the brickwork.
- Step flashing: the stepped run up the side of a chimney or along a gable wall, following the brick courses so each step is tucked into a joint.
- Cover flashing: a strip fixed into the wall above and hanging down over another piece, so water runs on to the lower piece and not behind it.
- Back gutter: the small channel behind a chimney, which carries water around the stack to the sides.
- Soakers: small folded pieces of lead, one under every tile or slate course along a wall, each turned up the brickwork and working with the step flashing above.
The thickness of the sheet is given as a code. Royston Lead's cast-lead brochure shows code 3 at 1.32 mm, used for soakers only, and code 4 at 1.80 mm, which is the lightest it lists for flashings. Codes 5 and 6 at 2.24 mm and 2.65 mm are listed for flashings too, and the heavier sheet from code 5 upward goes into gutters and the lining of larger details. A single chimney can easily contain two or three of these parts, fitted together in a set order.
Where the flashing is for a bay roof, a dormer or a valley, the parts have different names but follow the same logic. Our separate guide to lead sheet codes compares every thickness, and the soakers answer describes how the small pieces work with the courses around them.
How a flashing is held in place
A good flashing is secured at two edges, and each is handled differently. The upper edge goes into the wall. A roofer cuts a groove, called a chase or raggle, into a mortar joint with a disc cutter, or uses a joint already open, and tucks the turned-in edge of the lead into it. The lower edge sits over the roof covering and is held down so wind cannot peel it back.
Wedges, clips and pointing
Lead is held in the groove with small wedges, which are folded strips of lead tapped in to grip the edge. The groove is then filled, either with fresh mortar or with a sealant. Mortar sets hard and matches the brickwork, and it was the old way. Sealant stays flexible. Which is better depends on the building, and our answer on pointing lead flashing with mortar or sealant weighs the two.
The lower edge, lying over tiles or a flat roof, is held with clips, which are strips of lead or other metal fixed to the structure that fold over the edge of the flashing. Nailing the face of a lead sheet is avoided, because every nail is a hole and the metal needs room to move.
That freedom to move is the reason for the way the pieces are cut and lapped. Lead swells in warm weather and contracts in cold, and a long sheet pinned rigidly at each end will in time give way. Flashing is therefore made in short lengths that overlap by a good margin, so each piece can shift a little without opening a gap. Sealant smeared over a worn joint ignores all of this, which is why it rarely lasts.
How lead flashing fails
Failure usually has one of a handful of causes, and they can be seen from the ground or in photographs of the roof.
Pointing falls out. The mortar or sealant in the groove cracks and drops away, the wedges loosen and nothing grips the top of the lead any more. Water runs behind the flashing and into the wall. This is the most common failure and the least costly to put right if it is caught early.
The lead lifts. A coastal gale gets under a loose lower edge and peels it back, bending it where it should lie flat. Once bent, it rarely settles correctly and the crease can crack.
The lead splits. Repeated heating and cooling fatigues the metal, and cracks appear along folds or at the corners of steps. Our answer on why lead cracks explains the process. A sheet that is too thin for its position or laid in too long a length cracks sooner.
The wrong detail. Flashing that was made as a single piece where it should be stepped, or tucked in too shallow a groove, never worked properly, and no repair can make a poor detail good.
Stop-gap fixes. Bitumen tape or a layer of sealant over a failing flashing can keep water out for a season and then hide the true condition of the lead from the next person who looks.
Signs you can spot yourself are stains on the ceiling beside a chimney breast, damp patches on a wall that meets the roof, and visible gaps or ripples in the metal when you look at the stack through binoculars. Do not climb up to check.
Repair or renew: how to decide
A flashing repair is right when the lead is sound and the fault is local. Re-pointing a groove, replacing a few wedges, re-dressing a lifted edge or fitting a patch to a single crack are all repairs. If the lead is of a suitable thickness and has not fatigued along its folds, a repair can add many years to it. MyJobQuote gives lead flashing a life of over 80 years, so an old flashing is not a bad flashing just because it is old.
Renewal becomes the better choice when the metal itself is tired. Cracks along several steps, thin or pitted lead, repeated patching, a flashing that was never the right shape, or lead that has been covered in so much sealant that nobody can see its condition are all signs. Replacing a whole chimney's worth of lead is also the sensible time to deal with the soakers and the back gutter, since those sit beneath the pieces being lifted.
What the costs look like
Checkatrade's repair table, dated June 2026, puts lead flashing repairs at £50 to £70 per metre, with VAT added on top. For a whole chimney, MyJobQuote (last updated 22 September 2026) gives £350 to £460 for new lead without a scaffold and £700 to £920 with one, and £150 to £250 for a patch. Our guide to lead roofing cost sets these beside labour, code and access.
We inspect the flashing and the wall behind it, take pictures of what is there, and name the outcome: repair, patch to see it through or replace. Where a repair is enough, that is the one we recommend.
How a flashing is renewed, step by step
Renewing lead round a chimney follows a set order, and the job is slow because each stage depends on the one before.
- Strip. The old lead is cut away and lifted. The roofer looks at what was underneath: the condition of the timber, the mortar joints and the underlay behind the old metal.
- Prepare. Loose mortar is raked out, damaged joints are made good, and any rotten batten or board is replaced. A new flashing laid over a soft base fails for the same reason as the old one.
- Fit the soakers and the tray. On a chimney, the back gutter and the lower apron go first, then the soakers are laid with the tiles beside the stack.
- Fit the stepped pieces. Each cover flashing is cut, dressed down into the brick joints and wedged in the chase.
- Point and finish. The grooves are filled, the lead is dressed neatly over the tile profile, and the roof is swept down.
A tidy job looks right from the street. The steps follow the brickwork evenly, the laps are straight, and the metal lies flat against the roof without being stretched or kinked. That is the square finish we mean, and it matters because the dressing is both the weatherproofing and the thing everyone can see.
What to ask before work starts
Ask which lead code is going on, whether new soakers are included, how the grooves will be filled and whether any wall repair is in the price. We confirm these in the survey and bring up the work area on the day. Where scaffolding is needed for a tall stack, it is part of the planning from the start. Our lead roofing and leadwork page covers the jobs we carry out.
Questions
Lead flashing questions
Can I see a lead flashing fault from the ground?
Sometimes. Binoculars can show a lifted edge, a gap between the lead and the brickwork, or crumbling pointing round a chimney. Ceiling stains beside the stack are a clue too. Do not go on the roof to check; photographs taken during a survey show the lead close up without the risk.
Is lead flashing the same on a modern house as on a Victorian one?
The idea is shared, though the details differ. Older houses often have deeper brick joints and flatter slate roofs that suit stepped lead, while newer homes may use machine-made tiles with a different profile. The roofer adjusts the shape and the code to the roof in front of them.
How long does a flashing job take?
A small repair to pointing or a lifted edge can be a short visit. Renewing all the lead on one chimney takes longer because the stages follow each other, and weather can interrupt it. Damp or high wind makes lead work harder, so we say what the forecast means for your date.