
Finding a roof leak · 10 min read
How roofers find a roof leak
A ceiling stain rarely sits under the hole in the roof. This guide follows the method a roofer uses to follow a leak to where it starts, working from the loft out to the gutter line, and says when to stop and call someone.
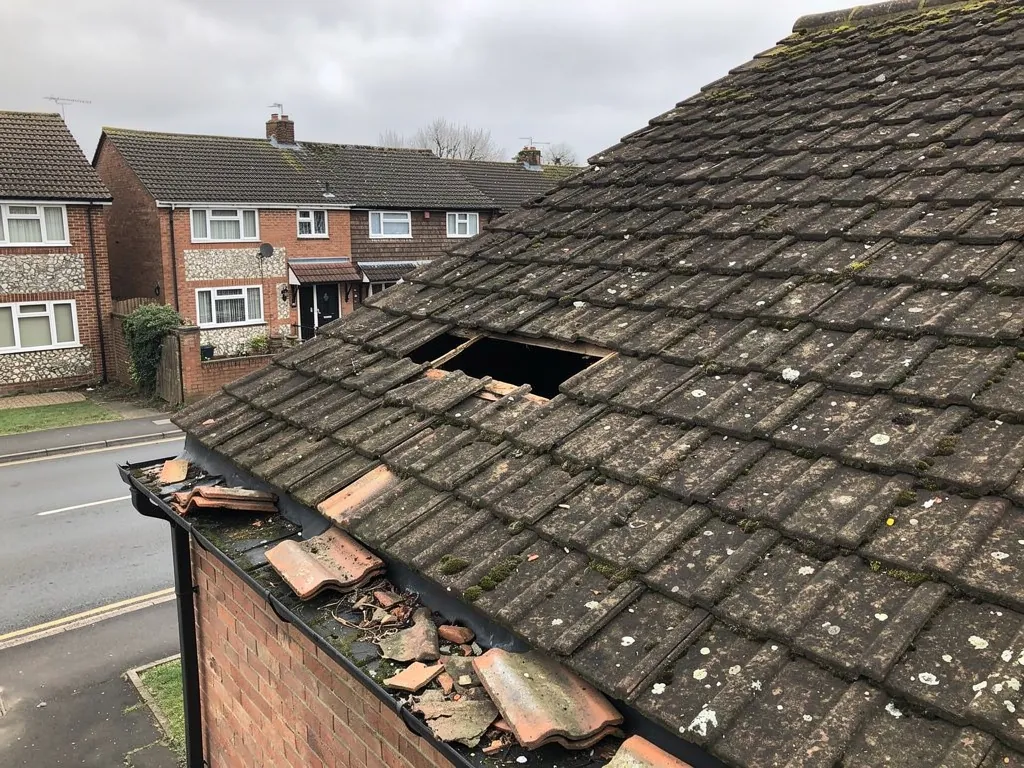
Water is a poor guide to where it came from. It runs down a rafter, along a felt, across a ceiling joist and drips from a point a metre or two from the hole. So the stain on the bedroom ceiling tells you a leak exists, but not where it begins.
Finding the source is a matter of method rather than luck. A roofer starts with the evidence indoors, works back up through the loft, then checks the outside from the lowest edge to the highest point, looking at each place water can get past a covering. Only when that fails does the job move on to hoses, moisture meters or a thermal camera.
You can do the first part yourself, and it is worth doing because it narrows the search and gives a roofer something to start with. The second part belongs on the roof, and that is where the danger is. Roofs are slippery, ladders slip and old coverings can crack underfoot, so nothing here asks you to go up. The sections below explain what each step looks for, what the signs mean and where the usual culprits hide, which lets you give a clear account of the problem and weigh up any proposal.
Read the stain before you look at the roof
Begin indoors, and begin with questions. Does the stain appear only in or after heavy rain, or does it also show in a dry spell? Does it grow in one direction? Is it a ring with a darker edge, or a damp patch with no outline? Do you see it on a ceiling, a wall below a chimney, or round a skylight? The answers work like a first sketch of the problem.
A stain that shows up only when the wind pushes rain at one face of the house points to something on that side: a loose tile, a failed joint in a flashing, a wall that is soaking up weather. A stain that appears after any rain, however calm, points to a covering that has failed outright or a valley or flat roof that cannot shed water. One that lingers in dry weather may be an old leak that has soaked into plaster, or it may be condensation, which we cover below.
Mark and photograph it
Draw a light pencil line around the edge of the stain and write the date beside it. Photograph it with something for scale. When you come back after the next rain, you can see whether it has grown, and that tells you whether the leak is active. It also gives the roofer a record that is far more useful than a verbal description.
Follow the water uphill
Water on a pitched roof runs down the slope, but once it reaches timber or felt it travels along them, so the stain is usually down-slope from the entry point and often sideways. As a rule of thumb, look higher than the stain, and then along the line of any rafter or wall. Where the stain sits against a wall or round a fitting, read the notes on a damp patch on the ceiling first.
In the loft: what a torch will show you
The loft is the best place to look, if there is a safe way in and you can walk on the joists or boards without stepping through the ceiling. Go up in daylight with a good torch. Switch the torch off for a moment, too: a pinprick of daylight through a roof is a gap in the covering that a torch beam hides.
Start above the stain and look for four things. Wet or darkened timber, usually a rafter or batten with a tide mark. Damp or flattened insulation with a stain under it. A drip line running down a rafter. And rust on nail tips or clips, which means moisture has been present for some time. If the underlay is visible, look for tears, slipped laps or places where it has dropped between the rafters and is holding water like a hammock.
Dry marks, wet marks and old marks
Touch the timber if you can do so safely. A dark but dry tide mark is history: water has been here, but not recently. A damp or cold surface says the leak is live. A clear, wet drip means the entry point is close and probably above. Old, dry stains are no reason to relax, because a leak that only shows in some winds can sit dry for weeks.
Check around anything that passes through the roof. Chimney breasts, soil and vent pipes, extractor ducts and the edges of roof windows each have a junction that is a candidate. Our note on a roof leak around a vent pipe describes why those junctions fail.
If you see no moisture in the loft but a stain indoors, do not assume the roof is sound. Water can travel along a lead flashing or a wall and appear lower down, and what looks like a leak can be condensation instead.
Leak or condensation: telling them apart
Many suspected leaks are moisture from inside the house. Warm air from cooking, washing and breathing rises into the loft, meets cold timber and underside surfaces, and deposits water. The result is damp, mould, frosting on nail points in winter and a drip that follows a cold night rather than a wet one.
Some clues set them apart. Condensation tends to spread evenly across a wide area, often on the north side or along the coldest surfaces, and it peaks in cold weather whether it rained or not. A leak is local, follows rain and is usually worse in the wind direction that drives water at that point. If the drip appears on a dry, cold morning, suspect condensation. If it follows a downpour by an hour, suspect the roof.
Ventilation is part of the answer. Moisture control in lofts is the subject of BS 5250:2021, which BSI currently shows as under review. Marley's guidance ties the eaves gap to the pitch where an HR underlay is used: 25mm for pitches of 15° or less, and 10mm above that. A blocked eaves vent, insulation pushed hard against the felt or a missing extractor can all produce a convincing imitation of a roof leak.
When it is both
The two can overlap. A small leak above wet insulation can look like condensation, and condensation can hide the signs of a small leak. A roofer treats the two separately, solving the one that is easiest to prove, then checking whether the other remains. Our guide to the causes of roof leaks lists the faults that sit behind most genuine leaks.
From outside: where roofers look first
With the indoor evidence in hand, a roofer climbs, or studies the roof from a ladder, a mobile tower or a camera drone, and works from the lowest edge to the highest point. The order matters because a fault high on the roof is easy to blame for a stain that actually started lower down.
- Gutters and eaves. A blocked or overflowing gutter lets water run back under the first course of tiles and into the wall.
- Slipped, cracked or missing tiles and slates. Sometimes a nail has rusted through and the unit has dropped, a pattern known as nail sickness.
- Valleys. Two slopes drain into every valley, so one failure there lets in a lot of water.
- Ridges and hips. Cracked or loose capping and failed pointing let water down the middle of the roof.
- Verges. The tiles at a gable edge can lift in wind and let rain in under them.
- Flashings. The strips of lead or other metal at walls, chimneys and dormers are the most common place for water to get past a covering that is otherwise sound.
- Penetrations. Vent pipes, flues, aerials and roof windows each need a seal.
Everything gets photographed. Close-up pictures of the fault are the proof behind the written verdict, and they let you see the problem without climbing up. A flashing that has lifted from its wall, a tile with a cracked corner or a ridge bed gone to dust are all faults that are plain once they are on a screen.
Our roof repair survey visit page describes what we check on a visit, in the order we check it.
Hose tests: how a roofer provokes the leak
Sometimes the roof looks fine and the loft shows only a stain. Then a roofer tries to make it leak on purpose. It is called a hose test, and it works only if it is done in a particular order.
Two people are needed: one on the roof with the hose, one inside watching the stain or the loft with a torch, ideally with a phone or radio. The person outside starts at the bottom of the suspect area and wets one small zone at a time, pausing between zones. If the hose starts at the top, water runs down over everything, and when the drip appears you have no idea which spot caused it.
Pacing and patience
Leaks can take several minutes to travel, so each zone needs a long gap before moving on, and the first drip may appear after the hose has already moved. Run water on the lower slope, then the flashing, then the ridge and so on up the roof. Keep the flow gentle. A hard jet forced up under tiles can push water where rain would never go and convict an innocent detail.
Limits of the method
A hose test shows a path for water, not wind-driven rain, and it cannot reproduce a leak that happens only in a gale from one direction. It is also unsuited to some situations: water on a chimney can soak the masonry for days, and a hose pointed at a roof window or a fragile asbestos cement sheet is a risk the test does not justify. HSE guidance calls asbestos cement roofing fragile in every case, and its rule of thumb for anything built or refurbished before 2000 is to presume asbestos until shown otherwise.
Used with care, a hose test is a good tool. It is no substitute for looking.
Flat roofs and hidden leaks
Flat roofs behave differently because the water has nowhere to run. It can enter at a small hole and travel a long way between the covering and the deck before it drips, so the stain may be a long way from the fault.
The first check is for standing water. Puddles that remain long after rain mean the roof is not draining. BS 6229:2025, which replaced the 2018 edition in December 2025, keeps a minimum finished fall of 1:80, and roofers usually design steeper, around 1:40, to leave a finished roof that drains. Ponding over a seam, an upstand or an outlet is a prime suspect, as are blisters in felt, splits at the edge trim, cracked sealant round a roof light and an outlet blocked with leaves.
Looking where you cannot see
Some leaks stay hidden. Moisture meters read dampness in the deck, ceiling or wall from the surface, and thermal imaging can show the cooler patches where insulation is wet. These are tools for narrowing a search, not for diagnosis on their own. Checkatrade, in a table updated September 2026, gives about £260 for a roof inspection or £210 for a drone survey, plus VAT, worth weighing against the cost of a leak that stays unsolved.
One caution: spray foam. Energy Saving Trust advises against spraying foam on to a leaking roof, and RICS cautions that badly fitted insulation may lead to damp problems. Foam also hides the timber a roofer would normally inspect, which can make a leak very hard to trace.
If an evening of searching has not found the fault, stop. Put a bucket down, take photographs and ask for a proper survey. Our roof repairs page explains how we take it from there.
Questions
Finding a roof leak, answered
Why is the stain so far from the hole in the roof?
Water follows timber, felt and masonry as well as gravity. It can run along a rafter or a lead flashing for some distance before it finds a gap in the ceiling and drips. That is why a roofer works uphill and sideways from the stain, not straight above it.
Can a leak be found when it is not raining?
Often, yes. Torchlight in the loft, tide marks on timber, rust on nails and torn underlay all show a past leak, and a roofer can inspect flashings, valleys and tiles from outside in dry weather. A hose test can provoke the leak if the signs are unclear.
Do I need scaffolding just to find a leak?
Not usually. Many leaks can be traced from the loft, a ladder, a tower or a drone, and scaffolding is needed only when the repair itself calls for it. If it is, the licence takes time, so ask early and check whether any quote includes it.