
After a storm · 9 min read
Post-storm roof inspections: what a roofer looks for
After a gale the damage is often small, scattered and out of sight from the pavement. Here is what a roofer checks, in order, and what you can do safely while you wait.
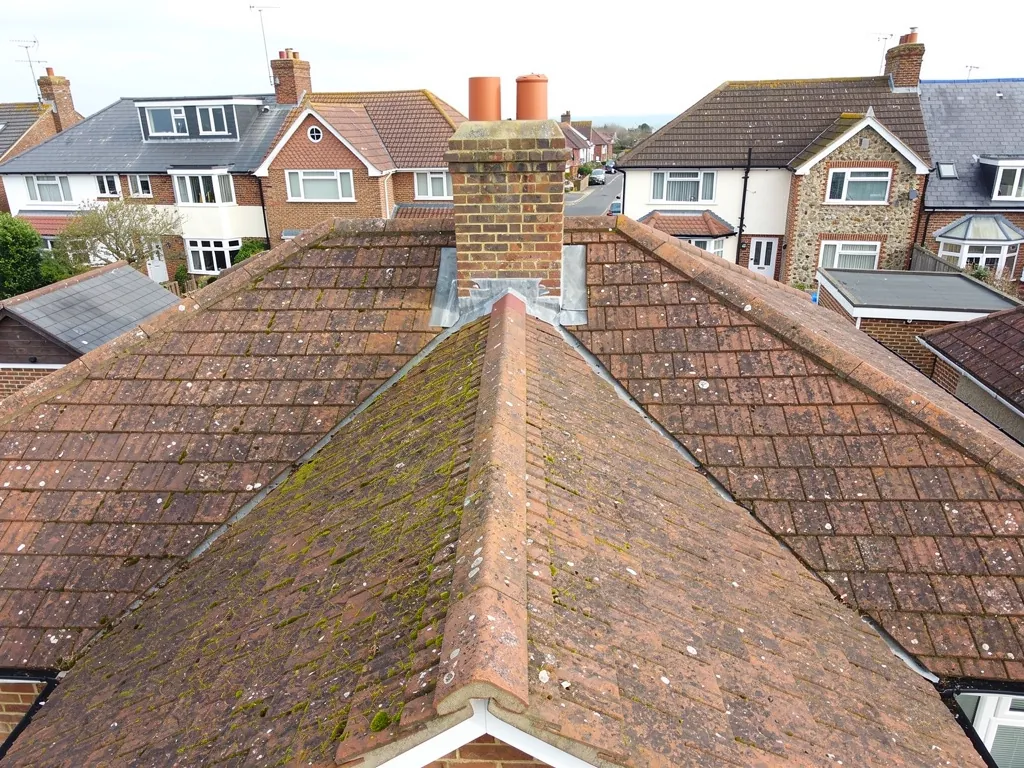
A big blow off the Channel leaves its evidence in odd places. A neighbour's fence is flat, the bin is in the road, and you feel fairly sure the roof came through. Then three weeks later a stain opens up above the landing and nobody connects it to the night of the gale.
That delay is the problem with storm damage. Wind rarely strips a roof outright. It lifts a tile and drops it a few centimetres out of line, cracks a ridge capping, peels back a strip of lead or fills a gutter with debris. Each of those lets rain in slowly and quietly, and each is far cheaper to deal with when found early.
A proper post-storm inspection is a short, ordered job. This guide follows the order a roofer works in, starting at ground level and finishing in the loft. It also covers what to do before anyone climbs up: staying safe, photographing what you can see, and ringing your insurer first. None of it needs you to go near the roof yourself. Our main page on roof inspections and surveys explains the visits we carry out.
Staying safe before anyone looks
The first job after a storm is to stay off the roof. Wet slates and tiles are slippery, loose fittings can move under a hand, and a ladder footed on a flooded garden or a lawn full of branches can shift. The roof will still be there tomorrow. Your wrist might not be.
What to do from the ground
Stroll round the outside of the house with your head tilted back. Binoculars help, as does the zoom on a phone. You are hunting for breaks in the regular pattern of the tiles, pieces lying in the garden, a tilted chimney pot, a gutter hanging at one end and anything dangling from the eaves. Keep children and pets clear of any spot beneath a loose tile or a sagging gutter.
Photograph everything you see, wide first and then close. Pieces on the ground tell a roofer what has come off and from roughly where. Take the pictures before you tidy, because a heap of broken tile on a patio is evidence.
If something looks as though it could fall, such as a chimney leaning over a pavement, keep people away and ask for help rather than propping or tying anything. Structural engineers' advice for storm-hit homeowners is that the council's Building Control team is the body to tell about a structure that looks dangerous.
Indoors
Look at the ceilings, the tops of the walls and the area around the loft hatch. Stand a bowl or bucket under any drip and shift furniture out of the way. A temporary cover over an opening needs a roofer with proper access and fall protection, so do not improvise one with a sheet and a ladder. Our emergency roof repairs page describes how we deal with an active leak: stop the water first, then plan the lasting repair.
Tiles, slates and the pattern of the roof
Once the roofer is up, the first look is at the covering itself. Concrete and clay tiles lock into an even pattern, and a missing or slipped tile breaks it. Wind gets underneath, lifts the tile against its nail or clip and either drops it back askew or throws it clear. The ones nearest the edges and the top of the roof take the worst of it.
On a slate roof the signs are slightly different. Slates hang on nails or hooks, and a gust that finds one loose will often drag its neighbours with it. Look for slates that have slid down the slope, leaving a pale, clean strip of the batten showing, or slates that have twisted on their fixings.
Cracks you cannot see from below
The harder damage to spot is the crack in a tile that is still in place. A flying branch, a roof ladder set down hard or a tile flexing in the wind can split one without moving it. Rain finds the line and runs through into the underlay. A roofer works across the slope from a roof ladder or from scaffold, running a hand along each course and watching for hairline marks and chipped corners.
Old fixings matter here. A roof with nail sickness, where the nails have corroded or worked loose over the years, loses tiles to a gust that a sound roof would shrug off. When a storm takes one tile and the ones beside it are lifting, that is the pattern a roofer reports.
The honest answer is often small: a handful of tiles replaced, a few clips refitted and the area photographed before and after. Those photographs matter if you need to show an insurer what the storm did. Our guide to a missing roof tile covers the commonest single repair after a blow.
Ridges, hips and verges
The high and exposed lines come next, because that is where wind pressure peaks. The ridge is the run of capping tiles right along the apex. Hips are the cappings down the sloping corners of a hipped roof. Verges are the finished sides of a gable end, where the tiles meet the wall. Each is held on with mortar, clips, screws or a mixture.
Storms tend to show up the older method of fixing. Since the 2014 revision of BS 5534, mortar on its own is no longer accepted as the fixing for ridge and hip tiles, which now need a mechanical fixing as well. A ridge bedded in mortar and nothing else may have cracked, loosened or lost whole sections, and a capping that sits proud or rocks when touched is a sign of it.
What the roofer checks
Along the ridge, the roofer looks for gaps between caps, crumbled mortar and any capping that has shifted along the line. At each hip the bottom tile is the weak link; if it goes, the ones above can follow. At the verge, the question is whether the edge tiles are held down and whether the mortar or trim that finishes the edge is still whole.
Dry-fix systems have a standard of their own, BS 8612:2018, and a dry ridge can lose a clip or screw like any other fixing, so these are examined too.
Where the damage is minor, a capping can be refixed and the joints re-pointed. Where long runs have cracked and moved, re-bedding and fixing the full length is usually the better outcome. We explain that sort of call with photographs of your own roof. Our ridge tile repairs page sets out what the work involves.
Flashings, chimneys and the leadwork
Water finds the junctions. Anywhere the slope meets a wall, a stack or the cheek of a dormer there is a strip of metal sealing the joint, and a gale likes to pry at it. Lead is the usual choice. It is heavy, easy to work and long-lived, but an edge can still be lifted, folded back or pulled clear of the brickwork in a high wind.
The chimney is the most exposed junction on the roof. A roofer looks at the lead wrapped round the stack, the soakers (small lead pieces that slide under the tiles beside the stack), the flaunching around the pots and the pots themselves. Flaunching is the sloping mortar bed that holds a pot in place and sheds water away from it. Cracked flaunching and loose pots are a regular storm find.
What loose lead looks like
Lead that has lifted shows as a gap or a curl at the edge. The wall behind may carry a dark streak where water has run. Sometimes a section has slipped down and left bare brick showing. A photograph from the loft of a damp patch beside the chimney is often the first clue that the lead has been disturbed.
Small lifts can often be re-dressed and fixed back into the joint. Where lead has torn or split, a new section is cut and fitted. Lead sheet is graded by code number, which follows how thick it is, and the flashing grades start at code 4 in Royston Lead's brochure.
Our lead roofing and leadwork page explains how flashings are dressed and fixed, and the chimney repairs page covers stacks, pots and flaunching.
Gutters, fascias and flat roofs
The roofline gets a rough ride in a gale. Gutters hang from brackets screwed into the fascia, the board behind them, and when the wind drags on a full length of plastic or cast iron, brackets pull out and sections drop. Look for a sag or a joint that has opened. A gutter hanging at one end pours water down the wall and into the brickwork.
Fascias and soffits suffer as well. The soffit is the board that closes the underside of the overhang. Panels can be blown out, which opens the eaves to rain, birds and insects. Painted timber that was already soft takes the worst of it.
Flat roofs after a storm
A flat roof needs a different eye. Wind can lift the edges of a membrane and tear the trim where the covering meets the wall. On felt, look for a split or a lifted lap. If the roof is EPDM, a rubber membrane laid as one sheet, look for a loosened edge or a puncture. On GRP, a glass-reinforced plastic coating, look for cracking along the edge trims.
Ponding, where water now sits on a roof that used to drain, can show that debris has blocked an outlet or that the deck has moved. Clearing an outlet is quick; a dip in the deck is not.
Flat roofs on garages and extensions matter because they sit close to ceilings and show leaks fast. Our guide to flat roof surveys looks at moisture and outlets in more depth, and the guttering, soffits and fascias page covers the roofline.
Insurance, photographs and what to do next
If you think the storm caused the damage, the order of events matters. Which? says to contact your insurer promptly, and to keep all receipts if you have to organise urgent repairs yourself, because they form part of a claim. Structural engineers make the same point about pictures, which show the insurer what actually happened.
So the sequence is simple. Make the property safe, speak to your insurer first, take your pictures while the debris is still lying where it fell, and file every receipt for a temporary fix. Hold on to damaged items until you are told you can discard them.
What the policy may not cover
A storm claim is not automatic. Which? lists a roof in poor repair letting rain into the house among the things that count as wear and tear, and reports that only 32% of storm-related claims made in 2024 resulted in a payout, quoting Financial Conduct Authority figures. We cannot say what any policy will pay. If you are unhappy with a decision, Which? says to complain to the insurer first, then the Financial Ombudsman Service, which it describes as free to use.
Choosing who comes out
Storms bring unsolicited offers. Anyone who knocks and tells you the roof is dangerous deserves a polite no and a request for the details in writing. Ask for photographs of the actual fault, a written total price and a clear description of the work. Our guide to roof inspections for an insurance claim shows what a useful report holds. Send us your photographs and we will tell you plainly what the storm did and what the roof needs.
Questions
Storm inspection questions
How soon after a gale should the roof be checked?
Once conditions are calm enough to be safe, because small openings let rain in for weeks before a stain shows. A walk round the outside with binoculars costs nothing. If you see missing tiles, a lifted ridge or a hanging gutter, or a ceiling has marked, arrange a proper look and have the roof made safe before the next bad forecast.
Should I call my insurer or a roofer first?
Your insurer, then the roofer. Which? advises contacting the insurer and telling them if you arrange emergency repairs, with receipts kept. Photograph the damage first. A temporary repair to stop water coming in is usually sensible, but ask the insurer what they expect before you commit to permanent work.
Can wind damage a roof without any tiles coming off?
Yes. Tiles can crack, clips can loosen, ridge mortar can split and lead can lift at an edge without anything landing in the garden. The signs are often a stain in the loft or on a ceiling weeks later. That is why a short inspection from the roof and the loft is worth having after a severe gale, even when the roof looks tidy from below.