
Lead dormers · 10 min read
Lead-clad dormers: cheeks, tops and aprons
A dormer is three small roofs in one box. Here is how lead is used on the cheeks, the top and the front apron, and what goes wrong when any of them lets water in.
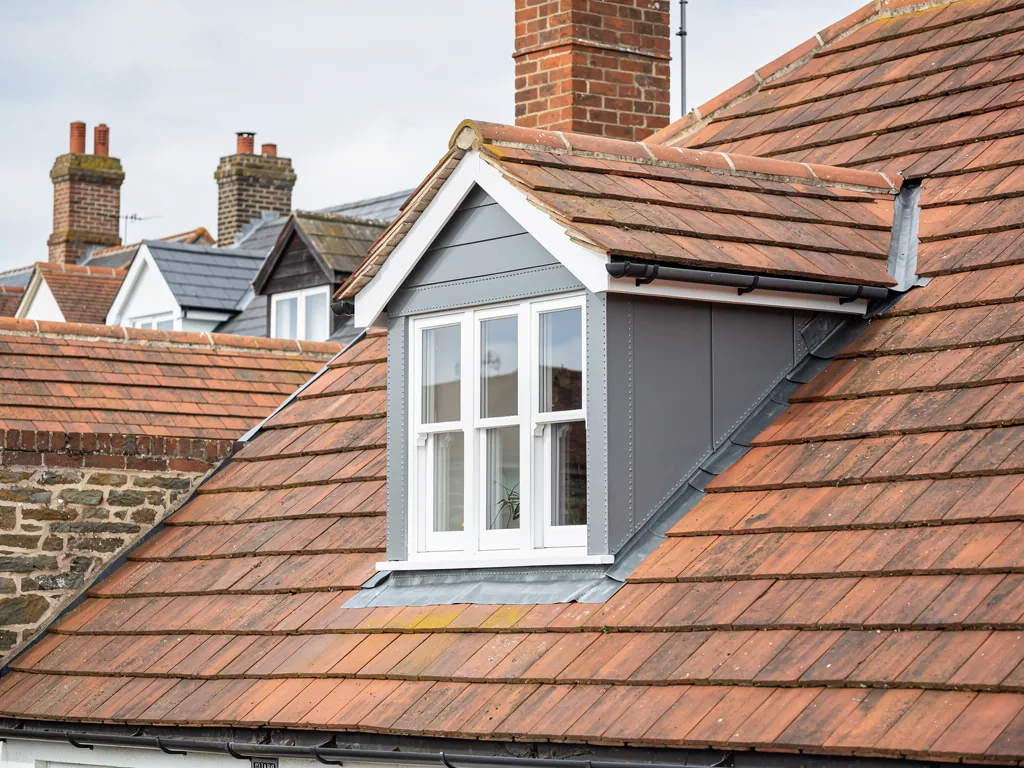
A dormer looks like a tidy little house on the roof, and from the street it is easy to forget that it is mostly joints. Two side walls, a roof, a front face and a window frame all meet a sloping main roof, and every meeting line is somewhere water can get in. Lead is used on dormers because it can be bent, dressed tight against awkward shapes and left to look after itself for decades.
Chalet bungalows and 1930s houses along this coast often carry dormers, and many have been clad in lead for as long as the house has stood. When one of them leaks, the stain on the bedroom ceiling rarely sits under the fault. Water runs along timbers before it shows, so the first job is to work out which of the dormer's surfaces has failed.
This guide goes through the three lead surfaces in turn: the cheeks at the sides, the top, and the apron under the window. It covers which lead code suits which part, how each one fails, and when a repair will hold or the cladding should be renewed. Where planning or Building Regulations come into it, that is covered near the end.
Three surfaces on one small box
Before choosing a repair, it helps to name the parts, because roofers and homeowners often describe the same fault in different words.
Cheeks, top and apron
The cheeks are the two side walls of the dormer. On many houses they are timber framing clad in lead sheet or hung tiles, and they are the surface you see from the garden. The top is the small roof over the dormer, sometimes pitched and tiled, often nearly flat and covered in lead or another metal. The apron is the strip of lead that sits below the window and laps down over the main roof slope, so water running off the front face lands on the tiles rather than behind them.
Around the edges you will see flashings, the strips of lead bridging the gap between dormer and tiles. Where the tiles meet a cheek, a stepped line of lead climbs the side, each step a separate piece. Under each tile course sits a soaker, folded from a small square of lead and turned up the wall, and the flashing laid over that upturn covers the joint.
The back gutter
Behind a dormer, where the main slope runs up into the back of the box, water has to be steered round the dormer on both sides. A lead back gutter does that job, a shallow trough running across the slope that tips water into the valleys at the sides. It is the most overlooked part of the dormer, and it collects leaves and moss because nobody sees it from the ground.
A leak at any of these parts looks the same from indoors, which is why a dormer leak is worth finding properly. Our guide on a leaking dormer covers the diagnosis side from the repair-first end.
Which lead code goes where
Thickness is what the code number stands for, and the codes are set out in BS EN 12588. A higher code means thicker, heavier sheet. The Royston Lead cast-lead brochure marks each code with the uses it is made for, and dormers have their own column in it.
| Code | Thickness | Royston lists it for |
|---|---|---|
| 3 | 1.32 mm | Soakers only |
| 4 | 1.80 mm | Soakers, flashings, pitched valley gutters, dormers |
| 5 | 2.24 mm | Flashings, valley, parapet and box gutters, dormers |
| 6 | 2.65 mm | Flashings, valley, parapet and box gutters, dormers |
| 7 | 3.15 mm | Valley gutters, box gutters, dormers |
The same brochure carries code 8 at 3.55 mm for the heaviest work. So the codes for dormer cladding run from 4 upward, and code 3 is the one thing that is ruled out for flashings.
What the table cannot tell you is which code a particular dormer needs. That depends on the detail. A cheek with a short, well-supported sheet and a steep fall is a different job from a wide flat top that carries foot traffic when the window is cleaned or the gutter is cleared. Thicker sheet resists denting and splitting but weighs more, which matters on framing built for a lighter covering.
A roofer who writes the code on the quote is giving you something you can check against the table. Ask for it. The survey is where the cheek lengths, the top area and the back gutter get measured, and the quote is built on those. Our guide to lead codes goes through the choice for other parts of the roof.
Cheeks: lead against a vertical wall
A cheek is a small wall that needs a waterproof skin, and lead suits it because it takes the shape of the framing without joints at every corner. The sheets are fixed at the top and held at the bottom with clips, so the lead can move a little without tearing.
That movement is the thing to understand. Lead expands in warm weather and contracts as it cools, and a sheet fixed hard at both ends will eventually crack where it is trying to move. Good cheek cladding is therefore made of sheets of modest length, joined with a roll or a lapped drip, a small raised timber or a step that carries the next sheet over the joint. Over a long, tall cheek the lead tries to creep downhill under its own weight, and the joints and clips are what hold it up. Our short answer on lead rolls and drips shows what those joints look like.
Where the cheek meets the tiles
At the lower edge, the cheek lead finishes over the main roof with a flashing, and at the tile line the stepped soakers and flashings take over. This is the most intricate part of the cheek and the place where the work shows its quality. Each step has to sit square to the tile course, the lead is dressed hard into the angle, and the top edge of each flashing goes into a chase cut in the wall or is held by a lead wedge, never left to hang open.
The fixings matter as much as the lead. Lead clips and wedges, not a bead of sealant, hold the edges in place, and sealant is a stopgap that fails faster than the metal around it.
Timber behind a cheek is the other check. Where water has been getting in for years the framing can be soft, and new lead over wet timber will not last.
The top: a small flat roof with falls
The top of a dormer is a flat roof in miniature, and the usual flat-roof rules apply to it. The first is that water must run off. Lead is laid in sheets on a timber deck, and the deck is built with a slight slope, called a fall, so that rain leaves the surface instead of lying on it. Standing water on lead shows that the deck has sagged or the falls were never right.
For general flat roofs covered with flexible membranes, BS 6229:2025 keeps a minimum finished fall of 1:80, and roofers usually design steeper so the finished roof still drains. The standard is written for membranes rather than sheet metal, but the thinking carries over to a dormer top. Our guide to flat roof falls and drainage explains how falls are built up with tapered timbers called firrings.
Rolls, drips and the edge
A wide dormer top is laid in bays. Each bay is divided from the next by a roll, a rounded timber batten wrapped in lead, and runs down to the front edge. Where the lead steps down, a drip, a small vertical step, carries water over the joint and stops it being drawn sideways.
Lead is long-lived when it is laid well. Less gives a lead flat roof as 50 to 100 years, and MyJobQuote puts lead flashing at more than 80 years. A top that has failed after much less than that is more likely to be a detail problem than old age.
How a lead-clad dormer fails
Lead dormers fail in a short list of ways, and each has its own clue. If you can tell the clue, you can describe the problem accurately, and the repair that fits it will be clearer.
Cracks, splits and lifted edges
Cracks usually follow a fold or a clip line, where the lead has flexed back and forth with the temperature. A hairline crack at a bend is a repair job: the sheet is cut out and replaced, or a patch let in. Several cracks across the same sheet point to a sheet that was too long, too thin or fixed too hard, and the sensible fix is to relay it. Our short answer on lead cracking looks at the causes.
Lifted edges are a different problem. When the top of a flashing has come out of the wall chase, the wedge has slipped or the pointing has dropped away. The lead may be perfectly good. Re-wedging and re-pointing that edge is a small job, and it is the repair that holds when the sheet itself is sound.
Water that shows somewhere else
The stain beside a dormer window is often blamed on the window, and sometimes the window is at fault. A failed seal round the frame, a cracked sill or a blocked back gutter can all produce the same mark. Water that arrives in heavy rain from one direction points to the cheek or flashing facing it. Water that arrives after a long wet spell points to the back gutter or the flat top.
We look at the lead with photographs, and we check the timber behind it. The verdict that follows is plain: a repair if the sheet is sound and only the edges have gone, a patch for now if a wider renewal has to wait for a dry spell, and a full renewal of the cheek or the top if the lead is worn, cracked in several places or laid wrongly in the first place.
Renewing, paying for it and getting consent
Renewing the lead on a dormer is a job priced from the survey. The number of cheeks, the area of the top, the length of flashing, the code chosen and the access all move the figure, and a dormer that sits two storeys up over a pavement needs scaffolding that a ground-floor bay does not. Once the dormer has been looked at, the price comes back in writing as one figure for the whole job.
Access can add a lot. Checkatrade's October 2026 table has scaffolding for a detached bungalow at about £1,000 a month, and a dormer that needs more than a ladder brings that sort of cost into the sum. When prices differ, look at whether VAT and scaffolding are in each.
Renewing like for like
Replacing old lead with new lead in the same pattern is usually not development at all, since it leaves the look of the building unchanged. A listed building is different, and so is a house under an Article 4 direction, so check with your council first if either applies.
Building a new dormer
Adding a dormer is a bigger undertaking. It involves cutting into the roof structure, and Building Regulations approval is needed where structural alterations are made, which is the Planning Portal's test. Planning rules also bite hard here: the permitted development right for dormers does not apply on article 2(3) land, which includes conservation areas, the South Downs National Park and Chichester Harbour National Landscape. Check with your local planning authority before drawing anything, and with your building control body once you have a design. Our guide to dormer roofs covers the build side, and the lead roofing and leadwork page sets out the lead work we do.
Questions
Lead dormer questions
Can the lead on a dormer cheek be patched with sealant?
Sealant can slow a leak for a short time, but it is a stopgap. It does not hold a lead edge as a clip or wedge does, and it traps water behind it when it cracks. A proper repair re-dresses or replaces the faulty piece of lead and secures it mechanically. If a patch is all that can be done in bad weather, treat it as temporary.
Does a dormer window leak because of the lead or the frame?
Either, and the pattern tells you which. A stain that follows driving rain from one side usually points to a cheek, flashing or the window seal on that side. A stain that appears after long wet spells points more towards the back gutter or the flat top. Photographs from the survey tell the two apart before anyone strips lead.
How do I know if my dormer needs new lead or just repairs?
Sound lead with lifted edges, loose wedges or failed pointing needs repair. Lead that is cracked across several sheets, worn thin or laid so that it moves with every temperature swing is better renewed. Damp timber behind the lead tips the decision towards renewal, because new lead over a wet frame will not last.